

Leaky showerheads – we’ve all been there, standing under what should be a refreshing cascade of water, only to discover a subtle drip-drip turning our serene shower into a watery battlefield. It’s not just an annoyance; it’s a water-wasting, bill-inflating catastrophe! But fret not, dear reader, because we’re diving into the nitty-gritty of troubleshooting these tricky leaks and turning your shower experience from soggy to sensational.
The Drip Dilemma
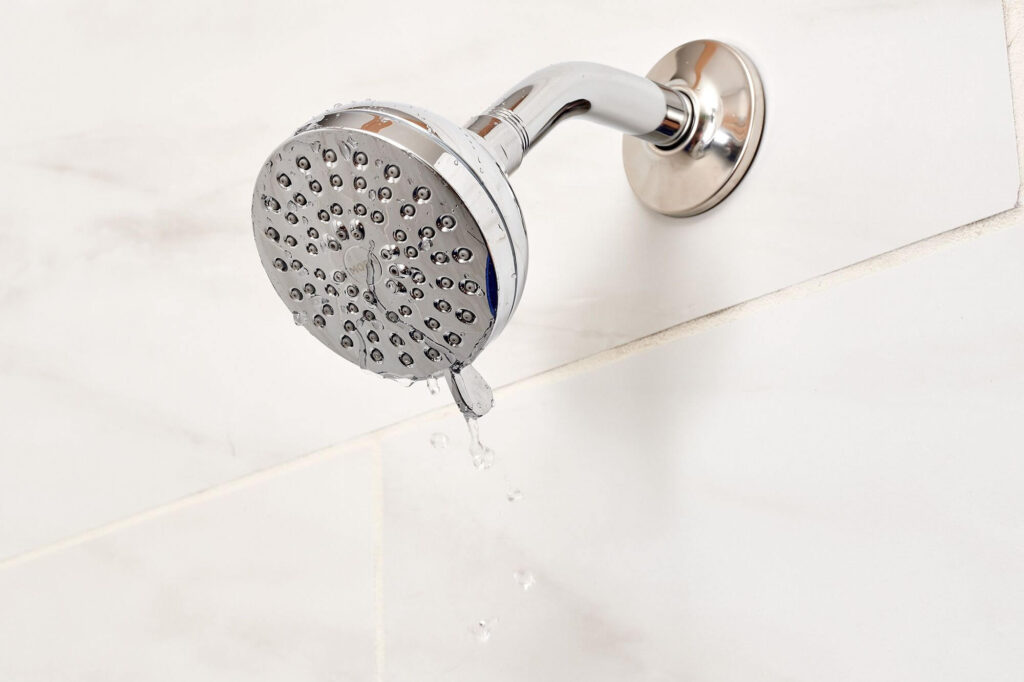
Ever had that late-night revelation where you wonder if your showerhead moonlights as a miniature waterfall? It’s not uncommon, especially in the hustle and bustle of Brooklyn, New York, where showers are the frontline for starting or ending your day. So, why is your showerhead leaking like a faucet with a vendetta?
Saving the H2O and Your Wallet
First and foremost, let’s address the elephant in the room—water conservation. With each drip, you’re not just losing water; you’re throwing your hard-earned cash down the drain, and we’re not talking about a metaphorical drain here. Brooklynites know the value of a dollar, and a leaky showerhead is a silent saboteur on your monthly water bill.
Now, before you think about summoning a plumber, let’s take matters into our own hands. We’re going to unravel the mystery behind that leak, and you’ll be the hero saving gallons of water in your Brooklyn abode. So, buckle up as we embark on a journey to troubleshoot that leaky showerhead and restore peace to your bathroom domain!
Understanding the Components
Identifying the Culprits Behind the Drips
So, your showerhead is leaking, and you’re eyeing it like a detective on a mission. First things first, let’s get acquainted with the usual suspects—the components of your showerhead:
- Showerhead Body: The main unit responsible for delivering that delightful stream of water.
- Swivel Ball: A pivotal player that allows you to adjust the angle of your showerhead. It’s the joint that gives your showerhead its mobility.
- Shower Arm: The unsung hero connecting your showerhead to the water supply. Often overlooked but crucial for the whole operation.
- Washer: A small but mighty component, usually made of rubber, preventing water from leaking out where it shouldn’t.
- O-ring: Another sealing champion, often found in the swivel ball, ensuring a watertight connection.
How They Tango Together
Now that we know our players, let’s understand the dance they perform to give you that perfect shower experience. When you turn on the water, it travels through the shower arm, meets the swivel ball for some flexibility, and finally bursts forth from the showerhead. It’s a symphony when all parts harmonize, but when one goes rogue, we’re dealing with a leaky situation.
Common Causes of Leaks
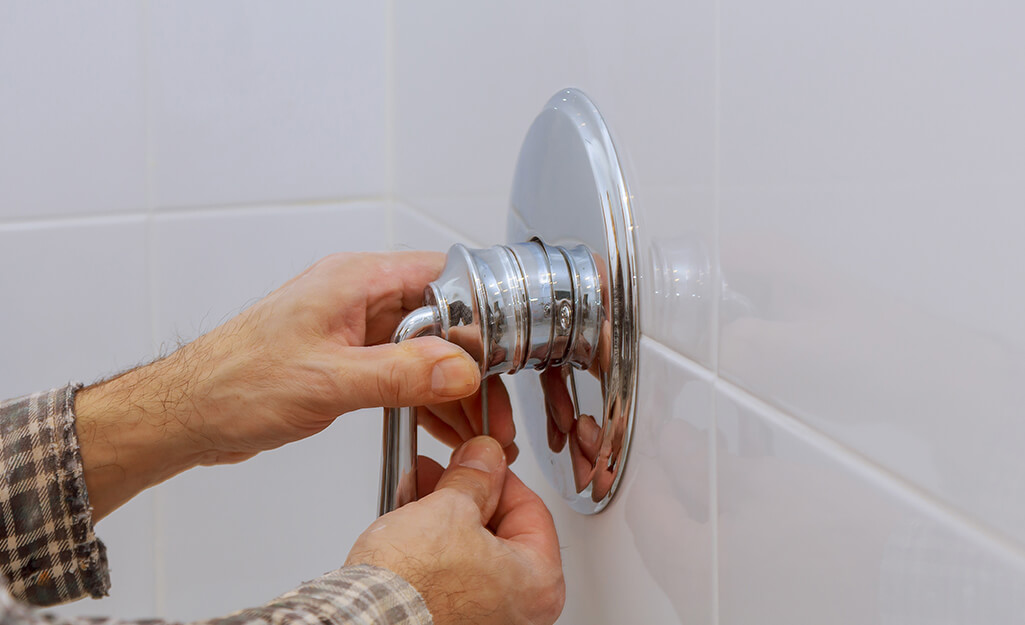
Loose Connections: The Sneaky Culprit
The usual suspect in the drip drama is loose connections. Imagine your showerhead as a rock band, and a loose part is the rebellious guitarist who refuses to play along. Tightening these connections can often be the gig-saving move.
Loose Showerhead
Spot the Signs:
- Noticeable movement when touched.
- Water seeping around the connection.
Fix It:
- Grab a wrench and snugly tighten the showerhead onto the shower arm.
Loose Swivel Ball
Spot the Signs:
- Excessive wobbling of the showerhead.
- Difficulty adjusting the showerhead angle.
Fix It:
- Locate the swivel ball and tighten it to restore stability.
Loose Connection to the Shower Arm
Spot the Signs:
- Water leaking where the arm meets the wall.
- Unusual movement of the showerhead.
Fix It:
- Check the connection to the shower arm and tighten if needed.
Worn-out Washers or O-rings: The Unsung Heroes Need a Replacement
These small yet crucial components, the washers, and O-rings, are like the backup singers in our showerhead ensemble. When they wear out, water finds a way to escape the stage.
Identify and Replace
Spot the Signs:
- Water leaks around the swivel ball or showerhead connection.
- Visible wear or deformation on the washers or O-rings.
Fix It:
- Remove the showerhead.
- Identify the worn-out washers or O-rings.
- Replace them with new ones.
This dance floor is getting crowded with potential culprits. In the next section, we’ll continue our journey to troubleshoot and banish those leaks for good.
Step-by-Step Troubleshooting Guide
Alright, Sherlock, you’ve identified the potential perpetrators causing your showerhead to leak. It’s time to put on your DIY detective hat and solve the case. Here’s a step-by-step guide to troubleshoot and bid farewell to those pesky drips.
Preliminary Checks
Ensure the Shower is Turned Off
Before you embark on this wet adventure, make sure your shower is in a state of zen—turned off and awaiting your expert touch.
Examine the Showerhead for Visible Leaks
Inspect your showerhead for any obvious signs of water escape. Sometimes, a quick visual check can point you straight to the heart of the problem.
Tightening Loose Connections
Using a Wrench to Tighten the Showerhead:
- Grab a wrench – your trusty sidekick in this mission.
- Gently but firmly, tighten the connection between the showerhead and the shower arm.
- Don’t go Hulk on it; a snug fit is what we’re aiming for.
Checking and Tightening the Swivel Ball:
- Locate the swivel ball, the joint that adds that dance-worthy flexibility.
- Carefully tighten it to restore stability.
- Ensure the swivel action is smooth but not overly loose.
Securing the Connection to the Shower Arm:
- Investigate the connection point between the shower arm and the wall.
- Tighten any loose screws or bolts.
- Confirm there’s no wobble in the connection.
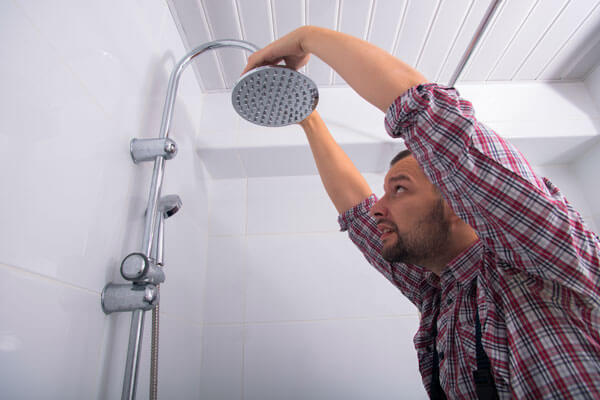
Inspecting and Replacing Washers or O-rings
Removing the Showerhead:
- Gently unscrew the showerhead from the shower arm.
- Place it on a soft surface to avoid scratches.
Identifying and Replacing Worn-out Washers or O-rings:
- Examine the washers or O-rings for signs of wear, tear, or deformation.
- Replace any damaged components with new ones.
- Secure the showerhead back onto the shower arm.
Cleaning Mineral Deposits or Sediment
Soaking the Components in a Vinegar Solution:
- Remove the showerhead as we did before.
- Submerge it in a bowl of vinegar, ensuring all the nooks and crannies are covered.
- Let it soak for at least 30 minutes to dissolve mineral deposits.
Scrubbing Away Deposits with a Brush:
- Use a soft brush to gently scrub the showerhead, focusing on areas with visible deposits.
- Rinse thoroughly with water.
- Reattach the showerhead to the shower arm.
Checking and Replacing the Showerhead Diverter:
If you suspect the diverter is causing trouble, follow these steps:
- Locate the diverter – often a small lever on the showerhead.
- Ensure it moves smoothly between different settings.
- If faulty, consider replacing it with a compatible part.
Examining the Shower Arm for Issues
Ensuring Proper Alignment:
- Confirm the shower arm is properly aligned with the water supply.
- Adjust if necessary to ensure a straight connection.
Replacing a Damaged or Corroded Shower Arm:
- If the shower arm shows signs of damage or corrosion, it might be time for a replacement.
- Unscrew the old arm and install a new one using plumbing tape for a secure seal.
Congratulations, Detective! You’ve successfully tackled the suspects behind the leaky showerhead. But, what about preventing a recurrence? In the next section, we’ll delve into some preventive measures to keep your shower in tip-top shape.
Preventive Measures
You’ve triumphed over the leaky showerhead saga, but let’s not rest on our laurels. To ensure your victory is long-lasting, it’s time to implement some preventive measures. Let’s dive into the arsenal of tricks to keep your shower in top-notch condition.
Regular Cleaning and Maintenance
The Shower Spa Day
Treat your showerhead to a spa day once in a while. Regular cleaning prevents the buildup of mineral deposits and ensures a smooth water flow.
- DIY Showerhead Cleaner:
- Mix equal parts white vinegar and water in a plastic bag.
- Secure the bag around the showerhead, ensuring it’s submerged in the solution.
- Let it soak for a few hours or overnight.
- Scrub away any remaining deposits with a brush.
- Clean the Filter:
- Some showerheads have filters that can trap debris. Check and clean these regularly.
Using a Water Softener
Softening the Blow of Hard Water
If you live in an area with hard water, your showerhead might be battling mineral deposits regularly. Consider installing a water softener to reduce the impact of hard water on your plumbing fixtures.
- Choose a Water Softener:
- Opt for a water softening system that suits your household needs.
- Install it according to the manufacturer’s instructions.
- Enjoy the Benefits:
- Experience the joy of softer water, reducing the chances of mineral buildup.
Installing a Shower Filter
Filtering Out the Trouble
Shower filters aren’t just for fancy spa-like experiences; they can be your showerhead’s best friend, protecting it from impurities and mineral deposits.
- Select a Quality Shower Filter:
- Choose a filter that targets your specific water concerns, whether it’s chlorine, sediment, or hard water minerals.
- Ensure it’s compatible with your showerhead.
- Easy Installation:
- Follow the instructions to attach the filter between the shower arm and the showerhead.
Upgrading to a High-Quality Showerhead
Investing in Showerhead Excellence
Sometimes, prevention starts with a good offense. Upgrading to a high-quality showerhead can significantly reduce the likelihood of leaks and maintenance headaches.
- Choose a Durable Material:
- Opt for materials like brass or stainless steel for longevity.
- Look for showerheads with a solid reputation for durability.
- Consider Modern Features:
- Explore options with anti-clog nozzles or easy-clean mechanisms.
- Invest in a reputable brand for added peace of mind.
When to Seek Professional Help
Knowing When to Call in the Calvary
While we’ve equipped you with DIY prowess, there are times when a professional touch is necessary.
- Persistent Leaks:
- If the problem persists despite your efforts, it might be a deeper plumbing issue.
- Consult a plumber to assess and resolve the situation.
- Complex Repairs: For intricate repairs or replacements beyond your comfort zone, professional intervention is the safest bet.
By incorporating these preventive measures into your showerhead maintenance routine, you’re not just fixing issues – you’re keeping them at bay. Remember, a little care goes a long way in ensuring your shower remains a sanctuary of relaxation, free from the drama of leaks and drips. In our final section, let’s wrap up our troubleshooting journey and emphasize the importance of timely action.
Sealing the Deal on Leak-Free Showers
In conclusion, your showerhead isn’t just a fixture; it’s a gateway to relaxation and rejuvenation. By taking the time to troubleshoot and maintain it, you’re ensuring that this sanctuary remains a stress-free zone. So, tighten those connections, replace those worn-out parts, and revel in the satisfaction of a leak-free shower – you’ve earned it!
Frequently Asked Questions (FAQ)
Q1: Why is my showerhead leaking?
A1: Leaky showerheads can result from various issues, such as loose connections, worn-out washers or O-rings, mineral deposits, or a faulty diverter. Identifying the specific cause is crucial for effective troubleshooting.
Q2: Can I fix a leaky showerhead myself?
A2: Absolutely! Many common causes of showerhead leaks, like loose connections or worn-out washers, can be addressed with some DIY know-how. This guide provides a step-by-step troubleshooting process to help you fix the issue.
Q3: How do I identify a loose connection?
A3: Signs of a loose connection include noticeable movement or wobbling of the showerhead, water seeping around the connection, or difficulty adjusting the showerhead angle. Tightening the connections using basic tools is often the solution.
Q4: What should I do if the issue persists after DIY attempts?
A4: If your DIY efforts don’t resolve the problem or if you’re uncomfortable with complex repairs, it’s advisable to seek professional help. A plumber can assess the situation and implement necessary fixes.
Q5: How often should I clean my showerhead?
A5: Regular cleaning is essential to prevent mineral deposits and maintain optimal water flow. Consider giving your showerhead a spa day with a vinegar solution every few months, especially if you live in an area with hard water.
Q6: Can I prevent showerhead leaks?
A6: Absolutely. Implement preventive measures like regular cleaning, using a water softener, installing a shower filter, and upgrading to a high-quality showerhead. These measures help minimize the risk of leaks and ensure a longer lifespan for your showerhead.
Q7: Is it necessary to replace the showerhead if it leaks persistently?
A7: Not necessarily. Persistent leaks may indicate a deeper issue, but before considering replacement, consult a plumber for a thorough assessment. It could be a repairable problem, saving you the cost of a new showerhead.
Q8: How do I choose the right shower filter?
A8: When selecting a shower filter, consider your specific water concerns, such as chlorine, sediment, or hard water minerals. Choose a filter compatible with your showerhead and follow the manufacturer’s instructions for installation.
Q9: Can a high-quality showerhead prevent leaks?
A9: Upgrading to a high-quality showerhead, made from durable materials like brass or stainless steel, can reduce the likelihood of leaks. Modern features like anti-clog nozzles also contribute to a longer lifespan for your showerhead.
Q10: Why is prompt action important when dealing with a leaky showerhead?
A10: Prompt action is crucial to prevent water damage and higher utility bills. Addressing a leak promptly not only conserves water but also ensures a stress-free and enjoyable shower experience in the long run.