
Leaky faucets, especially the ones hanging out in your backyard, can be more annoying than a catchy tune stuck in your head. We all know that water is a precious resource, and a leaking outdoor faucet is akin to letting your hard-earned money drip away. So, if your outdoor faucet is playing a soggy symphony, it’s time to conduct a little H2O orchestra and troubleshoot the issue.
The Importance of a Well-Functioning Outdoor Faucet

Now, you might be wondering, “Why bother fixing a tiny leak? It’s just a drop in the ocean!” Well, hold your seahorses! A seemingly minor leak can transform into a major flood, wreaking havoc on your water bill and potentially turning your backyard into a makeshift swimming pool. A well-functioning outdoor faucet is not just about convenience; it’s a practical move to prevent water wastage and keep your wallet from springing a leak of its own.
Common Causes of Outdoor Faucet Leaks
Before we dive into the nitty-gritty of troubleshooting, let’s talk about the usual suspects. Loose connections, cracked pipes, frozen nightmares, worn-out washers, and damaged seals – these are the culprits that turn your outdoor faucet into a waterworks display. Knowing these troublemakers is half the battle; the other half is giving them the boot.
Purpose of Troubleshooting
Imagine this: you’re in Brooklyn, New York, planning a summer barbecue in your backyard, and suddenly your outdoor faucet decides to moonlight as a miniature waterfall. Not the ambiance you had in mind, right? The purpose of troubleshooting is simple – to save you from such watery disasters. This guide is your toolkit, your roadmap to nip faucet leaks in the bud, ensuring you can enjoy that barbecue without needing a lifeboat.
Preliminary Assessment
Locate the Leaking Faucet
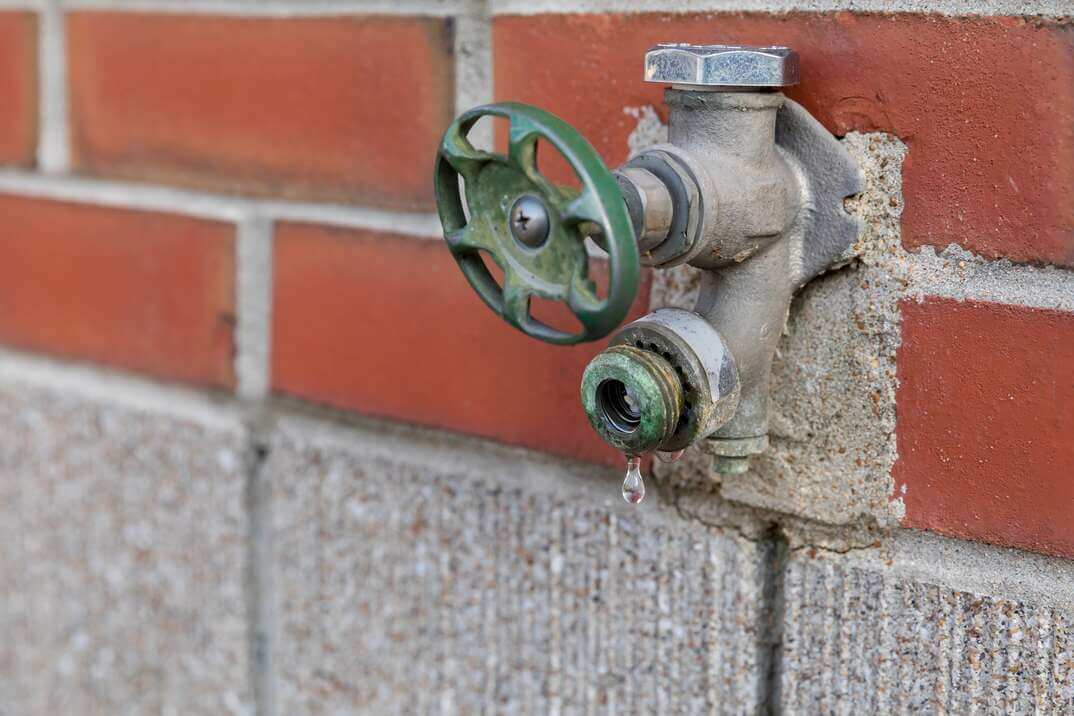
First things first, let’s play detective and find the leaky culprit. Take a stroll around your outdoor space and look for the telltale signs. Wet spots, puddles, or even a mossy patch can be dead giveaways. Note down the exact location; this will be your starting point.
Examine Visible Signs of Damage
Inspect the faucet closely. Any visible cracks, rust, or loose parts? Leaks often leave traces, like a watercolor painting telling the story of your faucet’s miseries. Make mental (or actual) notes of what you observe; it’ll come in handy during the fixing phase.
Turn Off the Water Supply
Before you start playing plumber, cut off the water supply to the misbehaving faucet. There’s no need to make this a splashy affair. Locate the shut-off valve, typically found somewhere along the pipe leading to the outdoor faucet, and give it a clockwise twist. Ah, silence!
Identifying the Cause
Now that you’ve set the stage, it’s time to unmask the troublemaker. Strap on your tool belt, and let’s get hands-on.
Loose or Damaged Connections
- Inspect Hose Connections: Check where the hose meets the faucet. Any loose nuts or connections? It’s like fixing a loose screw in your favorite chair – simple yet crucial.
- Tighten Loose Nuts or Connections: Got a wobbly connection? Grab a wrench and tighten it up. Remember, snug, not Hulk-tight – we’re fixing, not crushing.
- Replace Damaged Washers or O-Rings: If the leaks persist, blame it on the washer or O-ring. Pop off the handle, swap out the worn-out parts, and voila! You’ve just given your faucet a mini-spa day.
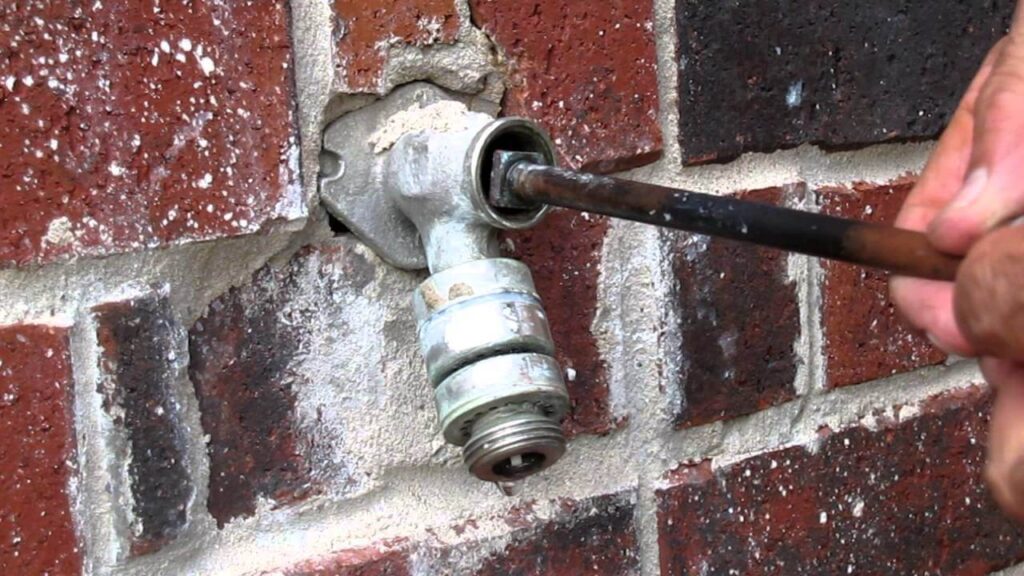
Cracked or Damaged Pipe
- Inspect the Pipe for Visible Cracks: Pipes, like bones, can crack. Examine the pipe for any visible fractures. A flashlight might be your trusty sidekick here.
- Tighten Loose Joints: Pipes have joints too, and they love a good snug fit. Use a pipe wrench to tighten any loose joints – teamwork makes the pipe dream work.
- Replace Damaged Sections of the Pipe: Sometimes, it’s best to let go. If the pipe is beyond repair, cut out the damaged section and patch it up with a new one.
Frozen Pipes
- Check for Frozen Water Within the Faucet: Winter can be harsh on pipes. If you suspect freezing, check for ice. A frozen faucet won’t spill the beans willingly.
- Thaw the Frozen Pipe Using a Heat Source: Warm things up. Use a hairdryer, heat gun, or even a heated towel to thaw the frozen pipe. Just don’t go overboard – we’re melting ice, not the whole faucet.
- Insulate Pipes to Prevent Future Freezing: Prevention is the name of the game. Insulate your pipes with sleeves or wraps to keep Jack Frost at bay next winter.
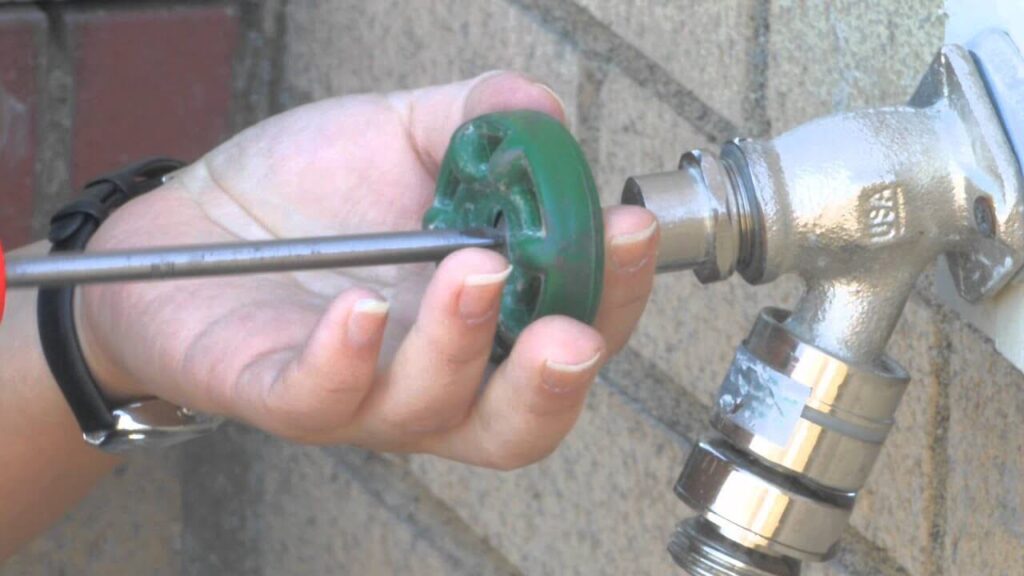
Faulty Faucet Washer
- Turn Off Water Supply: Safety first! Shut off the water supply to the faucet. No need for unexpected showers while fixing the issue.
- Disassemble the Faucet Handle: Faucets have secrets too. Remove the handle, reveal the internals, and spot the culprit – a worn-out washer.
- Replace the Worn-Out Washer: Out with the old, in with the new. Swap the worn-out washer for a fresh one, ensuring a watertight seal.
Worn-Out or Damaged Seals
- Examine Seals for Signs of Wear: Seals play a vital role. Check them for wear and tear, ensuring they’re up for the sealing game.
- Replace Damaged or Worn-Out Seals: No need for leaky dramas. Replace damaged seals with shiny new ones, and your faucet will thank you.
- Apply Lubricant to Ensure Proper Sealing: Lubricate those seals for smooth operation. It’s like giving your faucet a high-five for a job well done.
Tools and Materials
Time to assemble your arsenal. Here’s a checklist of tools and materials you’ll need:
- Pipe wrench
- Screwdriver
- Adjustable wrench
- Replacement washers
- O-rings
- Pipe cutter
- Replacement pipe sections
- Flashlight
- Hairdryer or heat gun
- Insulation sleeves or wraps
- Lubricant
Armed with this toolkit, you’re ready to tackle those leaks head-on. Remember, a dry faucet is a happy faucet!
Preventive Measures
Fantastic job on plugging those leaks! Now, let’s ensure your victory isn’t a one-time wonder. Maintaining a watertight outdoor faucet isn’t just about fixing problems as they arise; it’s a dance, a harmonious choreography of regular check-ups and preventive measures that’ll keep your faucet grooving for the long haul.
Regular Maintenance Tips:
- Inspect Outdoor Faucets Periodically: Picture this: you’re out in your backyard, the sun shining, birds chirping, and suddenly, there’s an unexpected water feature stealing the spotlight. To avoid such impromptu spectacles, make it a habit to inspect your outdoor faucets regularly. Look for subtle signs – a hint of rust, a drip, or any other irregularity. Early detection is your secret weapon against potential water catastrophes.
- Clean and Lubricate Moving Parts: Outdoor faucets are like the unsung heroes of your backyard, tirelessly delivering water for your plants, pets, and impromptu water balloon fights. Show them some love by cleaning and lubricating their moving parts. Remove any accumulated debris, give the handle a wipe, and apply lubricant to ensure smooth operation. Think of it as a spa day for your faucet – pampered and ready for action.
- Protect Faucets During Winter Months: Winter can be brutal on outdoor plumbing, turning your once-reliable faucet into a frozen nightmare. To prevent this chilly drama, install insulation sleeves or wraps around your outdoor faucets before the winter chill sets in. It’s like wrapping your faucet in a cozy blanket, shielding it from the icy clutches of Jack Frost. A little insulation goes a long way in preserving your plumbing sanity.
Professional Help
While basking in the glory of your DIY triumphs is undoubtedly satisfying, there are instances when calling in the professionals is the savvy move.
When to Seek Professional Assistance
- Persistent Leaks: You’ve tightened, replaced, and conquered, yet the leaks persist like an unwelcome guest. In such cases, it’s time to admit defeat and call in the cavalry. Professional plumbers have an arsenal of tricks up their sleeves to tackle even the sneakiest of leaks.
- Complex Pipe Issues:If your outdoor plumbing resembles a confusing maze, don’t attempt to be the hero navigating the labyrinth. Complex pipe problems are best left to the experts. A professional plumber can untangle the mess, ensuring your water flows smoothly without the DIY headache.
Hiring a Plumber or Handyman
- Do Your Research: When it comes to hiring a professional, a little research goes a long way. Seek out local plumbers or handymen with glowing reviews and satisfied customers. A reliable professional is like a trustworthy sidekick in your plumbing adventures.
- Provide Relevant Information to Professionals: When you make the call for professional assistance, be armed with information. Describe the issue in detail, mention the troubleshooting steps you’ve taken, and share any peculiarities you’ve noticed. The more information you provide, the quicker and more efficiently the professionals can diagnose and fix the problem.
Final Words
In the grand tapestry of outdoor faucet maintenance, troubleshooting leaks is just one colorful thread. Regular check-ups, a touch of DIY magic, and a sprinkle of preventive measures are the ingredients for a leak-free haven in your backyard. Revel in your newfound plumbing prowess, but remember – the key to faucet happiness lies in the delicate balance of proactive care and timely professional intervention.
So go ahead, let your outdoor faucet be the unsung hero of your backyard oasis, delivering water with grace and efficiency. With these preventive measures in place, you’ve not only fixed leaks but also set the stage for a plumbing performance that steals the show. Cheers to a dry and triumphant outdoor experience!
Frequently Asked Questions (FAQ)
- Why is my outdoor faucet leaking?
Leaky outdoor faucets can be caused by various issues, including loose connections, cracked pipes, frozen lines, faulty washers, or worn-out seals. Identifying the specific cause is crucial for effective troubleshooting.
- How do I locate the leaking outdoor faucet?
Start by visually inspecting your outdoor space for wet spots or puddles. Follow the water trail to pinpoint the leak’s location. This preliminary assessment will guide your troubleshooting efforts.
- What should I do if I find a leak?
Once you locate the leak, turn off the water supply to the faucet immediately. This prevents further water damage and allows you to address the issue without a constant water flow.
- Can I fix a leaking outdoor faucet on my own?
Yes, many outdoor faucet issues can be resolved through DIY troubleshooting. Loose connections, damaged washers, and minor pipe problems are common issues you can tackle with basic tools and replacement parts.
- What tools do I need for troubleshooting?
Essential tools include a pipe wrench, screwdriver, adjustable wrench, and a flashlight. Depending on the issue, you may also need replacement washers, O-rings, insulation sleeves, or a pipe cutter.
- How do I prevent outdoor faucet leaks?
Regular maintenance is key. Inspect faucets periodically, clean and lubricate moving parts, and protect them during winter with insulation sleeves. These preventive measures can significantly reduce the risk of leaks.
- When should I seek professional help?
If your troubleshooting efforts don’t resolve the issue, or if you encounter complex pipe problems, it’s time to call in a professional plumber or handyman. Persistent leaks and intricate plumbing challenges often require expert intervention.
- How can I find a reliable plumber or handyman?
Research local professionals, read reviews, and ask for recommendations from friends or neighbors. Look for experienced individuals with a track record of quality service.
- Can I use a heat gun to thaw frozen pipes?
Yes, a heat gun or hairdryer can be used to thaw frozen pipes. Apply gentle heat to the affected area, moving the tool back and forth until the ice melts. Avoid using excessive heat to prevent damage to the pipe.
- Is it necessary to turn off the water supply before fixing a faucet?
Yes, always turn off the water supply before attempting any faucet repairs. This ensures your safety and prevents additional water damage during the troubleshooting process.