
Hey there, fellow DIY warriors! Ever been hit with the unfortunate surprise of a clogged bathroom sink? You turn on the faucet, and instead of a graceful swan song, you get a sluggish, gurgling mess. Fear not, we’ve all been there, and we’ve got your back! In this guide, we’ll unravel the mysteries of unclogging a bathroom sink using some kick-butt do-it-yourself solutions. No need to call a plumber just yet – let’s roll up our sleeves and dive into the nitty-gritty.
The Crucial Sink Saga

Picture this: You’re getting ready for a hot date in the heart of Brooklyn, New York. The vibes are right, and you’re about to unleash your A-game. But, uh-oh, the sink decides it’s the perfect time to throw a curveball. Water’s not draining as it should, and panic sets in. Time to cancel the date? Not on our watch! We’re about to tackle this sink saga head-on.
Safety Precautions
Alright, champs, before we dive into the nitty-gritty of unclogging, let’s talk safety. No superhero ventures without the right gear, and tackling a clogged sink is no exception.
- Safety Gear Essentials:
- Rubber Gloves: Protect those hands from the unknown gunk lurking in your drain.
- Safety Goggles: Shield your eyes – splashes happen, and nobody wants a face full of drain drama.
- Old Clothes: Let’s be real; this is not a fashion show. Dress down and be ready for battle.
- Water Supply Off, Game On:
- Locate the shut-off valves beneath the sink.
- Turn them clockwise to cut the water supply. No watery surprises while you’re fixing things.
- Say No to Chemical Warfare:
- Skip the harsh chemicals. They might promise miracles but can wreak havoc on your pipes and your health.
Now that you’re suited up and ready, let’s tackle that unruly sink like the DIY warriors we are!
Basic Tools and Materials
Our first weapons of choice – plungers and Zip-It Drain Cleaning Tools. These trusty sidekicks will help you conquer that clog without breaking a sweat.
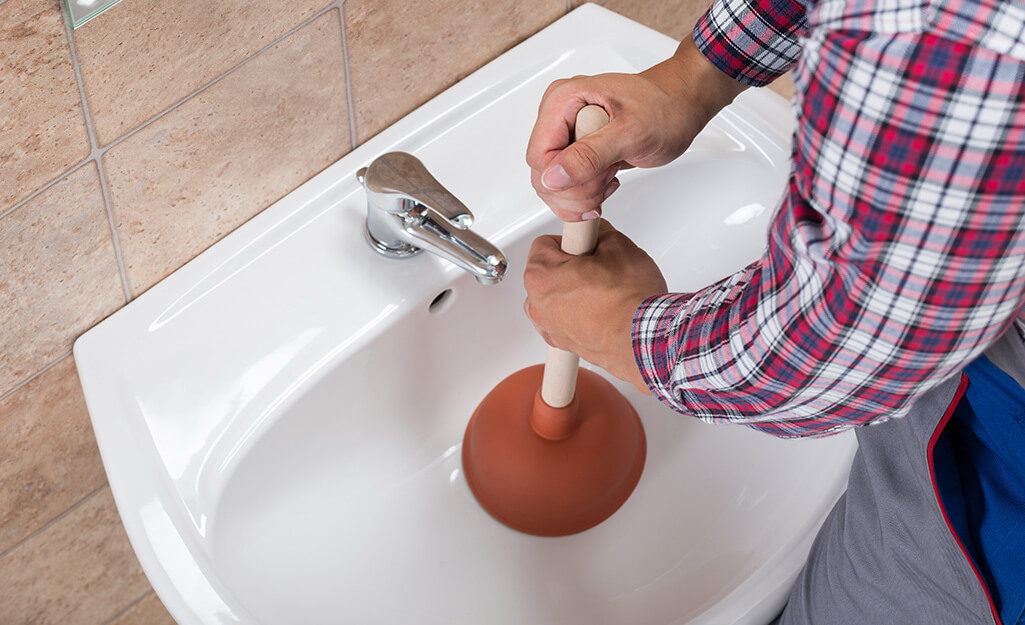
- Plunger Perfection:
- Choose Wisely: Opt for a cup-shaped plunger for sinks, not the one designed for toilets.
- Seal the Deal: Ensure a tight seal around the drain opening for maximum plunging power.
- Up and Down, Not All Around: Vigorous up-and-down motions, not a chaotic dance. Plunge like nobody’s watching.
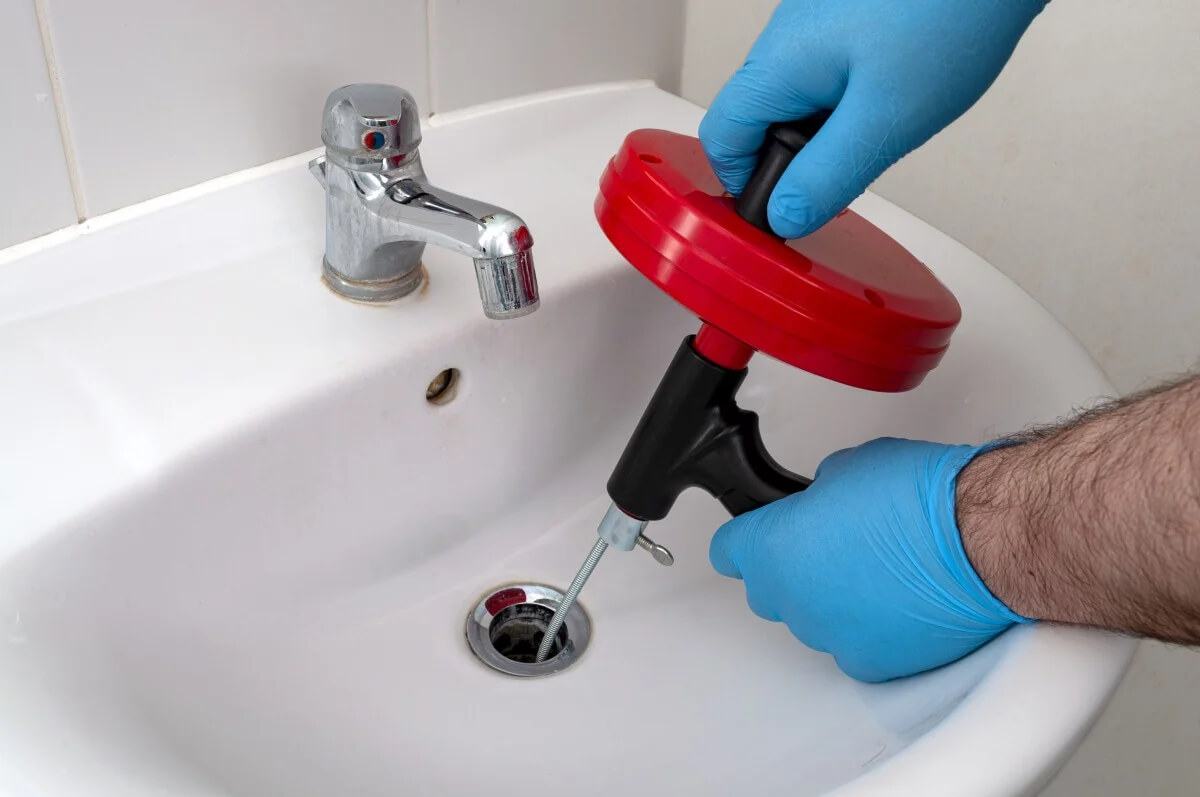
- Zip-It Drain Cleaning Tool:
- Snake Charmer: Slide it down the drain, twist, and pull. Watch the hair and gunk surrender.
- Handle with Care: Don’t go full force. Gentle maneuvers will do the trick without harming your pipes.
- Bucket and Old Towels:
- Contain the Chaos: Place a bucket beneath the sink to catch any water spillage.
- Old Towels: Line the area with towels – an extra layer of defense against the aquatic onslaught.
With your plunger, Zip-It tool, bucket, and towels in tow, you’re armed and dangerous. Time to face that clog head-on!
Natural and Homemade Drain Cleaners
Ah, the classic duo – baking soda and vinegar, the Batman and Robin of the DIY world. Let’s harness the power of fizz and bubble to bid farewell to that stubborn clog.
- Mixing Proportions:
- One Part Baking Soda: Start with a quarter cup or so.
- Two Parts Vinegar: Pour in half a cup and let the magic begin.
- Cover and Wait: Seal the drain and let the chemistry show unfold. About 15 minutes should do the trick.
- Salt, Baking Soda, and Boiling Water Boogie:
- Create the Mixture:
- Mix half a cup of salt with half a cup of baking soda.
- Pour the mixture down the drain.
- Boil, Baby, Boil:
- Follow it up with a kettle of boiling water.
- Let the scalding cascade break down the clog.
- Vacuum Victory:
- Proper Attachment and Settings:
- Attach the hose to your wet/dry vacuum.
- Set it to vacuum up liquids.
- Steps for Vacuuming:
- Cover the vent to create a tight seal.
- Place the hose over the drain and let the vacuum work its magic.
Time to let your sink do the happy dance as the clog surrenders to the forces of baking soda, vinegar, and vacuum power!
Removing and Cleaning the Sink Trap
Now, if your sink is still playing hard to get, it’s time to get intimate with the P-trap. Don’t worry; it’s not as complicated as it sounds.
- Locating the P-Trap:
- Underneath the Sink:
- Grab a flashlight and spot the U-shaped pipe.
- Bucket Ready:
- Position a bucket beneath the trap for potential water spillage.
- Tools for Removal:
- Adjustable Wrench: Loosen the slip nuts on both ends of the trap.
- Hand Gloves: Things might get a tad messy.
- Disassembly and Reassembly Ballet:
- Carefully Remove: Loosen the slip nuts, and gently take out the P-trap.
- Inspect and Clean: Check for gunk, and give it a good scrub.
- Reassemble: Put everything back together, ensuring a snug fit.
P-trap conquered, clog obliterated – your sink is well on its way to redemption!
Checking and Clearing the Overflow Drain
Just when you thought you had the upper hand, the overflow drain decides to join the party. Don’t fret; we’ve got a plan to handle this unexpected guest.
- Identifying the Overflow Drain:
- Top of the Sink: Look for a small opening near the top of the sink bowl.
- Connected to the Main Drain: The overflow drain connects to the main drainpipe.
- Flexible Wire or Cable Maneuvers:
- Uncoil the Wire or Cable: Use a flexible wire or cable.
- Gentle Exploration: Insert it into the overflow drain and maneuver it carefully.
- Twist and Turn: Twist the wire to catch any debris and pull it out.
- Flushing with Hot Water:
- Boil the Kettle: Get that water bubbling.
- Pour with Precision: Pour the hot water down the overflow drain.
- The Final Flush: Watch as the combination of wire wizardry and hot water sweeps away any lingering clogs.
With the overflow drain drama under control, your sink is now ready for a triumphant return to its full glory.
Prevention Tips
Congratulations on conquering the clog, but let’s not make this a recurring saga. It’s time for some preventive measures to keep your sink happy and hassle-free.
- Regular Maintenance:
- Monthly Checkup: Make it a habit to inspect your sink and drains.
- Preventive Measures: Run hot water down the drain regularly to flush out potential buildup.
- Avoiding the Buildup of Hair and Debris:
- Sink Guards: Invest in sink guards to catch hair and larger debris.
- Regular Cleaning: Remove and clean the guards to maintain optimal flow.
- Using Drain Guards:
- Hair Catchers: Install hair catchers on the drain to stop hair from causing trouble.
- Empty Regularly: Clean the catchers regularly to prevent blockages.
Maintaining a clog-free sink is all about being proactive. With these prevention tips, you’ll be the guardian your sink deserves.
Ready for the final chapter? We’ll dive into when it’s time to call in the professionals and wrap up our epic journey to sink salvation!
When to Seek Professional Help
You’ve battled the clog, unleashed DIY fury, and your sink is in better shape. But, and it’s a big but, there are times when the pros need to swoop in and save the day. Let’s navigate the waters of when to hang up your DIY cape.
- Persistent Clogs Despite DIY Efforts:
- Repeat Offender: If the clog keeps making a comeback despite your best efforts, it might be a deeper issue.
- Professional Assessment: A plumber can perform a thorough inspection to uncover the root cause.
- Signs of a More Significant Plumbing Issue:
- Foul Odors: Persistent unpleasant smells might indicate a larger problem in your plumbing system.
- Slow Draining Throughout the House: If multiple drains are misbehaving, it’s time for a professional intervention.
- Hiring a Professional Plumber:
- Vetting the Pros: Research and choose a reputable plumbing professional.
- Transparent Communication: Discuss the issue openly, and get a clear estimate of the costs involved.
- Timely Intervention: Don’t wait until your DIY efforts turn into a plumbing catastrophe.
While DIY is fantastic, knowing when to tap out and call in the pros is equally crucial. Remember, a happy sink is a well-maintained sink.
From Clog Chaos to Sink Serenity
There you have it, DIY dynamos – your guide to tackling a clogged sink like a seasoned pro. From plungers to homemade concoctions, you’ve journeyed through the realm of DIY solutions with swagger and finesse. Remember the safety gear, wielded the plunger with precision, and even took a peek inside the mysterious P-trap.
But hey, this isn’t just about fixing the now; it’s about preventing the next showdown. Regular maintenance, a watchful eye for debris, and some preventative measures – that’s your ticket to sink serenity.
And if all else fails, fear not the call of the plumber. They’re the unsung heroes ready to rescue your plumbing from the brink. So, pat yourself on the back, sink savior. Your DIY prowess has brought harmony back to the heart of your home – the mighty bathroom sink!
Frequently Asked Questions (FAQ)
Q1: What causes bathroom sink clogs?
A1: Bathroom sink clogs are typically caused by a buildup of hair, soap scum, toothpaste, and other debris that accumulates over time in the drain pipes.
Q2: Can I use chemical drain cleaners to unclog my sink?
A2: It’s not recommended. Harsh chemicals can damage your pipes and pose health risks. Opt for natural solutions like baking soda and vinegar for a safer approach.
Q3: How often should I perform sink maintenance?
A3: Regular maintenance is key. Consider a monthly checkup, running hot water down the drain to prevent buildup. It’s a small effort that goes a long way in maintaining a clear sink.
Q4: What’s the best plunger for unclogging a bathroom sink?
A4: For sinks, choose a cup-shaped plunger. Ensure a tight seal and use vigorous up-and-down motions to create the necessary suction for effective unclogging.
Q5: When should I seek professional help for a clogged sink?
A5: If your DIY efforts prove futile, or you notice persistent clogs, foul odors, or slow drainage throughout your home, it’s time to call in a professional plumber.
Q6: Can I use the same DIY methods for both metal and PVC pipes?
A6: Yes, the DIY methods mentioned are generally safe for both metal and PVC pipes. Exercise caution with chemical solutions to avoid damage, and always follow specific guidelines for your pipe material.
Q7: How do I prevent hair clogs in the sink?
A7: Invest in hair catchers or guards for your sink drains. Regularly clean and empty them to prevent the buildup of hair and debris.
Q8: What’s the purpose of the P-trap, and why should I clean it?
A8: The P-trap prevents sewer gases from entering your home. Cleaning it removes accumulated debris, preventing clogs and foul odors.
Q9: Can I use a wet/dry vacuum on any type of clog?
A9: Wet/dry vacuums are effective for certain clogs, especially those caused by larger debris. Ensure proper attachment and settings to avoid damage to the vacuum or pipes.
Q10: Are there preventive measures to avoid sink clogs?
A10: Absolutely! Regularly running hot water down the drain, using sink guards, and being mindful of what goes down the sink can significantly reduce the chances of clogs.